Code Snippets IIS wordpress

WordPress ISS Permalinks

Enabling Pretty Permalinks in WordPress

This walkthrough describes how to enable “Pretty Permalinks” for blog posts in the WordPress blog engine that is installed on IIS 7 and above. Typically, without URL rewriting functionality on a Web server, WordPress users must use “Almost Pretty” URLs, for example, http://contoso.com/index.php/yyyy/mm/dd/post-name/. By using the URL Rewrite module, you can use “Pretty Permalinks,” for example, http://example.com/year/month/day/post-name/, for WordPress blogs that are hosted on IIS.
Prerequisites

This walkthrough requires the following prerequisites:

IIS 7 or above with FastCGI and PHP installed. If you need to install PHP, follow the instructions in this article.
WordPress installed. If you need to install WordPress, follow the instructions in this article or use the instructions from the official WordPress site.
URL Rewrite installed.

Note that for the purposes of this walkthrough it is assumed that WordPress is installed in a Web site root directory. If WordPress is installed in a subdirectory, then the rewrite rules that are used in this walkthrough should be included in the Web.config file that is located within the same subdirectory where the WordPress files are.
Enabling Pretty Permalinks in WordPress

Use the following instructions to create pretty permalinks for your blog posts.

To enable pretty permalinks in Word Press:

Log on to WordPress with Administrator user rights.
In WordPress, click the Options tab.
On the Options page, click the Permalinks subtab.
This will take you to the page where you can customize how WordPress generates permalinks for blog posts.
On the Permalinks page, select Custom, specify below and enter “/%year%/%monthnum%/%day%/%postname%/” in the Custom structure text box.
Click Update Permalink Structure.

All the blog post links will have URLs that follow the format that you have specified, but if you click any one of those links the Web server will return a 404 – File Not Found error. This is because WordPress relies on a URL rewriting capability within the server to rewrite requests that have “pretty permalinks” to an Index.php file. In the next section, you will create a rule that will provide this capability.
Creating a Rewrite Rule

Open the Web.config file that is located in the same directory where the WordPress files are installed, and paste the following XML section into the system.webServer element:

<rewrite>
<rules>
<rule name="Main Rule" stopProcessing="true">
<match url=".*" />
<conditions logicalGrouping="MatchAll">
<add input="{REQUEST_FILENAME}" matchType="IsFile" negate="true" />
<add input="{REQUEST_FILENAME}" matchType="IsDirectory" negate="true" />
</conditions>
<action type="Rewrite" url="index.php" />
</rule>
</rules>
</rewrite>

This rule will try to match any requested URL. If the URL does not correspond to a file or a folder on the file system, it will rewrite the URL to the Index.php file. At that point, WordPress will determine which content to serve based on the REQUEST_URI server variable that contains the original URL before it was modified by this rule.
Testing the Rewrite Rule

After you save the rewrite rule to the Web.config file, open a Web browser and click any one of the permalinks in your WordPress blog. You should see the correct content returned by the Web server for each permalink.

Summary

In this walkthrough you learned how to use the URL Rewrite module to enable “pretty permalinks” in the WordPress blog engine. WordPress is just one example of the many popular PHP applications that can take advantage of the URL Rewrite module in IIS, a feature that enables user-friendly and search engine-friendly URLs.


By Ruslan Yakushev

http://www.iis.net/learn/extensions/url-rewrite-module/enabling-pretty-permalinks-in-wordpress
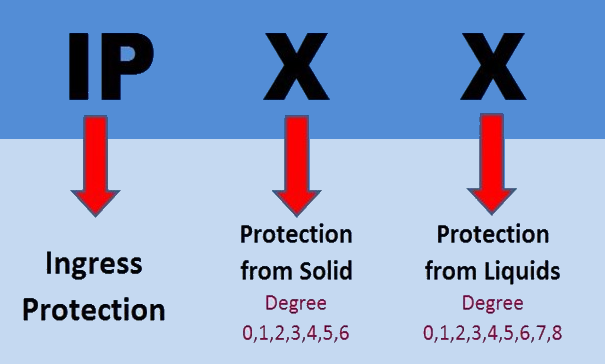
Tips & tricks Utils

Fix Internet Explorer Printing Blank Pages

I just ran into an issue where three different clients in the same morning reported that Internet Explorer was printing blank pages.  A quick search on Google turned up the following article: http://www.mutterances.com/?p=83.

The problem specifically manifests itself by printing a blank page with a footer (if you haven’t turned them off) displaying the following line: “file:///C:/Users/userprofile/AppData/Local/Temp/Low/randomfilename.htm”.

To fix this issue, you’ll need to bring up a command prompt (but not with elevated permissions) and type the following commands:

mkdir %userprofile%\AppData\Local\Temp\Low
icacls %userprofile%\AppData\Local\Temp\Low /setintegritylevel low

 
UPDATE:
I’ve also found some information from Microsoft’s site to fix the problem.  They even include a Microsoft Fix It utility to fix the problem automatically: http://support.microsoft.com/kb/973479.

12/2/2014 UPDATE:
I recently had a client contact us about this very problem but the challenge was slightly different.  The web application (online credit card processing) was using framesets and IE was attempting to print an empty frameset.  Microsoft suggests turning on Compatibility Mode, however, I suggested:

  • Highlight what you’d like to print
  • Right click the selection
  • Click Print
  • Make sure to select “Selection” in the page range box
  • Click Print


Thanks to http://www.datacorps.com/2012/09/28/how-to-fix-internet-explorer-printing-blank-pages/

RFID

RFID Standards

  • 125 Khz (low-frequency) tags are write-once/read-many, and usually only contain a small (permanent) unique identification number.
  • 13.56 Mhz (high-frequency) tags are usually read/write, they can typically store about 1 to 2 kilbytes of data in addition to their preset (permanent) unique ID number.
  • 860-960 Mhz (ultra-high-frequency) tags are typically read/write and can have much larger information storage capacity (I think that 64 KB is the highest currently available for passive tags) in addition to their preset (permanent) unique ID number.

Most read/write tags can be locked to prevent further writing to specific data-blocks in the tag’s internal memory, while leaving other blocks unlocked. Different tag manufacturers make their tags differently, though.

Depending on your intended application, you might have to program your own microcontroller to interface with an embedded RFID read/write module using a manufacturer-specific protocol.


RFID_vs_NFC

Uncategorized

How to Change Backup Location on MailEnable Backup utility

HKEY_LOCAL_MACHINE\SOFTWARE\Mail Enable\Mail Enable\Backup Directory = “D:\\MailEnable”

NOTE: MailEnable will automatically add “Backup\Sets” to the path from that registry key.

Don’t forget that if you’re running a 64-bit version of Windows you’ll need to run regedit out of the Windows\SysWOW64 directory. read more »

Tips & tricks Utils Windows 10

Como iniciar o Windows 10 no Modo de Segurança

A maneira mais rápida ——————————————————

  1. Digite MSCONFIG e clique em Configuração do Sistema:
    msconfig
  2. Clique na aba Inicialização do Sistema e clique em Inicialização Segura. Escolha Mínima e clique em Aplicar e depois em OK.
    inicializacao-segura
  3. Pronto! Na próxima reinicialização o Windows entrará em Modo Seguro. Posteriormente você deve voltar nesta tela de Configuração de Sistema e desclicar a opção “Inicialização segura” para o Windows carregar normalmente.

Clicando em  F8 no arranque do PC —————————————-
Quem tem saudades de pressionar a tecla F8 para entrar no em Modo de Segurança (entre outras opções) pode fazer isso no Windows 10 (e também no Windows 7 e Windows 8.x) seguindo o passo-a-passo abaixo:

  1. Clique com o botão da direita do mouse sobre o logo do Windows e clique em Prompt de Comando (Admin):
    prompt-de-comando-admin
  2. Digite bcdedit /set bootmenupolicy Legacy e tecle ENTER:
    tecla-F8-windows10
  3. Pronto! A partir de agora você pode pressionar a tecla F8 para entrar no Modo de Segurança no Windows 10:
    Como iniciar o Windows 10 no Modo de Segurança com tecla F8

Caso você queira voltar ao modo anterior (desconsiderando a tecla F8):
digite bcdedit /set {default} bootmenupolicy standard e tecle ENTER

A maneira mais técnica ———————————————————-
Abra a Central de Ações e clique em Todas as configurações:

– Agora clique em Atualização e recuperação:
– Acesse a categoria Recuperação e clique no botão Reiniciar agora exibido abaixo de Inicialização avançada:
– Se você não quer perder muito tempo nos passos acima, clique com o botão direito do mouse no botão Iniciar, mantenha a tecla shift pressionada e clique em Reiniciar:
– Na tela abaixo, selecione a opção Solução de problemas:
– Em seguida clique em Opções avançadas:
– Na tela Opções avançadas, clique em Configurações de inicialização:
– Agora clique no botão Reiniciar:
– Pressione F4 no teclado para iniciar o Windows 10 no Modo de Segurança, F5 para iniciar o sistema operacional no Modo de Segurança com Rede ou F6 para iniciar o sistema operacional no Modo de Segurança com Prompt de Comando:

Code Snippets MySQL SQL

Mysql Proper Case

    DROP FUNCTION IF EXISTS proper;
    SET GLOBAL  log_bin_trust_function_creators=TRUE;
    DELIMITER |
    CREATE FUNCTION proper( str VARCHAR(128) )
    RETURNS VARCHAR(128)
    BEGIN
      DECLARE c CHAR(1);
      DECLARE s VARCHAR(128);
      DECLARE i INT DEFAULT 1;
      DECLARE bool INT DEFAULT 1;
      DECLARE punct CHAR(17) DEFAULT ' ()[]{},.-_!@;:?/';
      SET s = LCASE( str );
      WHILE i < LENGTH( str ) DO 
        BEGIN
          SET c = SUBSTRING( s, i, 1 );
          IF LOCATE( c, punct ) > 0 THEN
            SET bool = 1;
          ELSEIF bool=1 THEN 
            BEGIN
              IF c >= 'a' AND c <= 'z' THEN 
                BEGIN
                  SET s = CONCAT(LEFT(s,i-1),UCASE(c),SUBSTRING(s,i+1));
                  SET bool = 0;
                END;
              ELSEIF c >= '0' AND c <= '9' THEN
                SET bool = 0;
              END IF;
            END;
          END IF;
          SET i = i+1;
        END;
      END WHILE;
      RETURN s;
    END;
    |
    DELIMITER ;
SQL Server

Query to list number of records in each table in a database

SELECT 
    t.NAME AS TableName,
    i.name as indexName,
    p.[Rows],
    sum(a.total_pages) as TotalPages, 
    sum(a.used_pages) as UsedPages, 
    sum(a.data_pages) as DataPages,
    (sum(a.total_pages) * 8) / 1024 as TotalSpaceMB, 
    (sum(a.used_pages) * 8) / 1024 as UsedSpaceMB, 
    (sum(a.data_pages) * 8) / 1024 as DataSpaceMB
FROM 
    sys.tables t
INNER JOIN      
    sys.indexes i ON t.OBJECT_ID = i.object_id
INNER JOIN 
    sys.partitions p ON i.object_id = p.OBJECT_ID AND i.index_id = p.index_id
INNER JOIN 
    sys.allocation_units a ON p.partition_id = a.container_id
WHERE 
    t.NAME NOT LIKE 'dt%' AND
    i.OBJECT_ID > 255 AND   
    i.index_id <= 1
GROUP BY 
    t.NAME, i.object_id, i.index_id, i.name, p.[Rows]
ORDER BY 
    object_name(i.object_id) 
Code Snippets

Migradoc vertical text


        Dim myTextFrame As TextFrame = Section1.AddTextFrame
        myTextFrame.Orientation = TextOrientation.Upward
        myTextFrame.Width = 10
        myTextFramew.Top = 0
        myTextFrame.Left = -14
        myTextFrame.Height = 600
   
        Dim myP As Paragraph = myTextFrame.AddParagraph
        myP.Format.Alignment = ParagraphAlignment.Center
        myP.Format.Font.Size = 8
        myP.AddText("text vertical")

Utils

Install SpamAssassin on Windows Server as a service

Here is a little tutorial on how to install SpamAssassin on Windows Server 2008 as system service:

  • Download and install the binary version of SpamAssassin (for example http://www.jam-software.com/spamassassin/)
  • Download NSSM (http://iain.cx/src/nssm/) and put the nssm.exe within Windows directory.
  • This is a wrapper to run spamd as service on Windows.
  • Now in a console type “nssm install SpamAssassin”, choose the spamd.exe file from the installation directory of SpamAssassin and put your parameters into the Options field.
  • Click on the install button and have a look to the server services. Here you have the SpamAssassin service ready to start.
SQL Server Transact-SQL

SQL SERVER – FIX : Error 15023: User already exists in current database.

Error 15023: User already exists in current database.

1) This is the best Solution.

First of all run following T-SQL Query in Query Analyzer. This will return all the existing users in database in result pan.

USE YourDB
GO
EXEC sp_change_users_login 'Report'
GO

Run following T-SQL Query in Query Analyzer to associate login with the username. ‘Auto_Fix’ attribute will create the user in SQL Server instance if it does not exist. In following example ‘ColdFusion’ is UserName, ‘cf’ is Password. Auto-Fix links a user entry in the sysusers table in the current database to a login of the same name in sysxlogins.

USE YourDB
GO
EXEC sp_change_users_login 'Auto_Fix', 'ColdFusion', NULL, 'cf'
GO

Run following T-SQL Query in Query Analyzer to associate login with the username. ‘Update_One’ links the specified user in the current database to login. login must already exist. user and login must be specified. password must be NULL or not specified

USE YourDB
GO
EXEC sp_change_users_login 'update_one', 'ColdFusion', 'ColdFusion'
GO

more details in http://blog.sqlauthority.com/2007/02/15/sql-server-fix-error-15023-user-already-exists-in-current-database/